
Replacing the front idler on a John Deere JD245GLC requires safely relieving track tension, supporting the excavator, removing the worn idler assembly, inspecting the recoil system, and installing a correctly matched replacement. Proper alignment and track-sag adjustment help prevent premature wear of track links, rollers, sprockets, and the new idler—especially in Ontario’s mixed construction conditions.
What Safety Steps Are Required Before Front Idler Replacement?
Park on level ground, lower the attachment, shut down the excavator, block movement, relieve pressure cautiously, and support the machine with correctly rated lifting equipment and stands. Never work beneath a raised machine supported only by hydraulic cylinders or a jack.
Replacing an excavator front idler involves stored energy in the track adjuster and recoil spring. A track frame can shift unexpectedly, and grease under tension can discharge with enough force to cause severe injury. Treat the job as a controlled lifting and pressure-release operation—not a routine bolt-on repair.
Before beginning a John Deere JD245GLC track repair, establish a clean exclusion zone around the machine. Ontario contractors working in wet clay, frozen ground, recycled aggregate, or demolition debris should take additional time to clear packed material from the track frame before lifting.
Use the following safety controls:
-
Park on firm, level ground with enough clearance to remove the track assembly
-
Lower the boom, arm, and bucket to stabilize the excavator
-
Turn the upper structure to provide safe access to the track frame
-
Shut off the engine, remove the key, and apply lockout/tagout procedures
-
Wear eye protection, gloves, steel-toe footwear, and close-fitting workwear
-
Use a calibrated lifting device, rated slings, hydraulic jacks, and substantial cribbing
-
Keep personnel away from the recoil spring’s line of travel
-
Loosen the grease relief fitting slowly; never remove it completely while pressure may remain
-
Follow the JD245GLC service manual for machine-specific lift points, torque values, and track-sag specifications
The front idler assembly is heavy, awkward, and close to energized recoil components. Assign one person to direct movement and keep communication clear when using a hoist or forklift.
Which Tools Are Needed to Replace an Excavator Front Idler?
You need rated lifting equipment, support stands, hydraulic jacks, hand tools, a grease gun, cleaning tools, measuring equipment, and manufacturer-approved service information. The exact lifting capacity and socket sizes must match the JD245GLC and the installed undercarriage configuration.
A prepared tool layout reduces downtime and prevents unsafe improvisation once the track is loose. Inspect every sling, shackle, jack, and stand before use. Do not use damaged chains, undersized lifting straps, or unstable wood blocks as primary supports.
For heavy equipment rental fleets and repair centers, keep a dedicated undercarriage kit available. It should include a grease-release tool, low-profile jack, chain breaker or track press access, torque-record sheet, and a proven replacement-part reference.
How Do You Relieve Track Tension Safely?
Relieve track tension by opening the grease release valve gradually while staying clear of the discharge path, allowing grease to escape until the front idler retracts and the track becomes loose. Stop immediately if tension does not release normally or components bind.
The grease-filled track adjuster pushes the idler forward to maintain tension. Releasing grease lets the adjuster retract. This is the key step that makes it possible to move the track and remove the old idler assembly.
-
Clean the grease fitting and surrounding area so contamination does not enter the adjuster.
-
Position the track where the upper run is accessible and where the machine is stable.
-
Use the correct wrench to slowly loosen the grease relief fitting.
-
Stand to one side, never directly in front of the valve or recoil mechanism.
-
Allow grease to escape slowly until the idler moves rearward and track slack is visible.
-
If the idler does not retract, do not force it with a jack. Inspect for hardened grease, damaged adjuster parts, seized slides, or recoil spring issues.
Grease can be under extreme pressure. Never place hands, face, or body parts near the fitting outlet. A small, controlled release is safer than attempting to remove the valve rapidly.
How Is the Old JD245GLC Idler Assembly Removed?
After tension is relieved, support the track, create enough slack to clear the idler, remove relevant guards or retainers, and lift the idler assembly out while controlling its movement. Remove track segments only when the available slack and access do not allow safe extraction.
Start by raising the excavator enough to support the track frame and create controlled clearance under the track chain. Use cribbing and rated stands beneath approved support locations. The track must remain supported throughout the procedure.
Depending on the machine condition and service setup, you may be able to pull the idler forward from the track frame with the chain intact. In other cases, separating the master link or removing a track segment is the safer choice. Avoid stretching, twisting, or dragging the chain across sharp surfaces.
A practical removal sequence is:
-
Remove mud guards, rock guards, or access covers that restrict idler movement.
-
Support the upper and lower track run with lifting equipment or blocking.
-
Mark the position of shims, wear strips, and guide plates before disassembly.
-
Disconnect retaining hardware according to the JD245GLC service procedure.
-
Attach a hoist to approved lifting points on the idler assembly.
-
Slide the idler rearward or forward as required, keeping fingers clear of pinch points.
-
Lower the removed assembly onto stable cribbing for inspection.
Do not discard shims or slide plates before inspection. Their condition tells you whether the old idler failed from normal wear, misalignment, debris packing, or a damaged recoil system.
What Should Be Inspected Before Installing the New Idler?
Inspect the recoil spring, hydraulic tensioner, slide brackets, guide plates, seals, track links, rollers, and sprocket before fitting the replacement. A new idler will not correct hidden alignment or tensioner damage, and it can wear out quickly if the root cause remains.
The most important inspection occurs after the old idler is removed and before the new unit enters the track frame. Clean the frame rails thoroughly. Packed Ontario clay, road salt residue, quarry fines, and forestry debris can hide cracked brackets or uneven wear strips.
Look for these conditions:
-
Worn or cracked idler slide brackets
-
Grooved, bent, or loose guide plates
-
Uneven wear on the idler running surfaces
-
Oil leakage around idler seals
-
Recoil spring damage, distortion, or corrosion
-
Tensioner-cylinder leakage or failure to retract smoothly
-
Track-link bushing wear and side-to-side wandering
-
Bottom rollers with uneven flange wear
-
Sprocket teeth that are hooked, sharp, cracked, or unevenly worn
AFT Parts recommends treating the idler as part of a complete undercarriage system. Track rollers, carrier rollers, idlers, and sprockets share the load. Replacing only the visibly failed component without checking its mating parts can transfer the same problem into the new assembly.
How Do You Install and Align a New Front Idler?
Install the new idler using rated lifting equipment, return shims and wear strips to their documented positions, secure hardware to manufacturer specifications, and confirm the idler runs centrally in the track frame. Alignment must be checked before track tension is restored.
Compare the replacement with the removed unit before lifting. Verify the part number, mounting geometry, width, guide surfaces, and track compatibility. A correct drop-in replacement should fit the JD245GLC track frame without forcing the assembly into position.
Use this installation process:
-
Clean all contact surfaces, brackets, and slide areas.
-
Position the new idler with a hoist and keep it level.
-
Guide the assembly into the track frame without striking seals or frame rails.
-
Reinstall wear strips, shims, guide plates, retainers, and guards in their original sequence.
-
Tighten fasteners with the specified torque and tightening pattern.
-
Confirm that the idler is centered and travels freely on both slide surfaces.
-
Check the relationship between the idler, carrier roller, lower rollers, track chain, and sprocket.
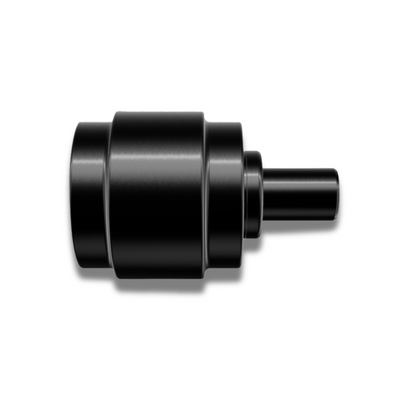
For a dependable replacement, consider the Front Idler 9303011 for John Deere from AFT Parts. It is positioned as a compatible replacement option for contractors, rental fleets, repair facilities, dealers, and equipment owners who need a practical undercarriage repair solution.
How Do You Set Correct Track Tension After Installation?
Set track tension by pumping grease into the adjuster slowly, moving the machine to settle the track, and measuring sag at the specified location under normal working conditions. Use the JD245GLC manual’s exact sag range because excessive or insufficient tension accelerates wear.
After the idler is installed, re-grease the adjuster gradually until the track reaches the manufacturer’s specified operating sag. Do not assume that a tighter track is better. Over-tightening increases rolling resistance and loads the idler, rollers, sprocket, pins, bushings, and final drive.
Move the excavator slowly forward and backward after adjustment, then measure again. This allows the track to settle naturally. Record the final setting, hours, part number, and inspection findings in the machine maintenance log.
Why Does Front Idler Alignment Matter in Ontario Worksites?
Correct alignment keeps the track chain centered and reduces side loading on idlers, rollers, links, and sprockets. In Ontario’s variable ground conditions, misalignment can turn mud packing, frost-heaved surfaces, aggregate, and abrasive debris into accelerated undercarriage wear.
A front idler does more than guide the chain. It supports the front end of the track system, helps maintain tension, and absorbs shock loads as the excavator travels. If it sits crooked, the track can scrub against guide surfaces and wear components unevenly.
Watch for warning signs after installation:
-
Track chain climbing or rubbing against idler flanges
-
Fresh metal polishing on one side of the frame
-
Repeated loss of track tension
-
Uneven roller flange wear
-
New noise, vibration, or resistance while traveling
-
Track shoes drifting sideways over the front idler
AFT Parts has built its aftermarket focus around precision-engineered undercarriage components compatible with equipment brands including CAT, Komatsu, Kubota, and John Deere applications. For Ontario contractors, this means evaluating compatibility, alignment, and jobsite conditions—not treating an idler as a generic wear item.
When Should You Replace an Excavator Front Idler Instead of Repairing It?
Replace the front idler when its tread is deeply worn, flanges are damaged, seals leak, the wheel is cracked, or internal wear has compromised smooth rotation. Repair may be appropriate only when a qualified undercarriage specialist confirms that the shell, shaft, bearings, and sealing surfaces remain serviceable.
Schedule inspections at daily walkarounds and during every planned service interval. Early detection is cheaper than a field failure that damages track links, forces an emergency recovery, or sidelines a machine during a critical project.
Replacement is generally the better decision when:
-
The idler shell has cracks or severe scoring
-
Flanges are thin, chipped, or visibly uneven
-
The idler leaks lubricant or shows contaminated oil
-
The idler wobbles, binds, or will not rotate smoothly
-
The track repeatedly loses alignment despite correct adjustment
-
The cost of machining and rebuilding approaches the value of a new assembly
For high-utilization fleets, record undercarriage wear trends rather than waiting for visible failure. This enables parts planning and helps avoid downtime during peak excavation, utility, site-preparation, municipal, forestry, or aggregate work.
What Makes the Front Idler 9303011 a Practical Replacement Choice?
A practical replacement idler matches the machine’s mounting geometry, track interface, and operating demands while providing dependable materials, sealing, and build consistency. The Front Idler 9303011 for John Deere is intended as a direct replacement option for JD245GLC undercarriage service.
AFT Parts was established to give heavy-equipment professionals a quality-focused alternative in the aftermarket wear-parts market. Its product range includes front idlers, track rollers, carrier rollers, and sprockets for customers such as contractors, rental companies, service centers, engineering firms, municipalities, forestry operations, mining companies, dealers, and distributors.
Before ordering, confirm:
-
Your excavator’s full model and serial-number range
-
The original idler or assembly reference number
-
Track-frame dimensions and guide arrangement
-
Whether a complete idler assembly or related tensioner parts are needed
-
Shipping timing, warranty terms, and compatibility confirmation
An idler replacement is most valuable when it solves the complete operating problem. Match the part accurately, inspect connected undercarriage components, and retain the service record for future maintenance decisions.
What Are AFT Parts Expert Views?
“A front idler rarely fails in isolation. In our undercarriage evaluations, the fastest repeat failures usually trace back to incorrect track tension, neglected debris removal, worn guide surfaces, or a recoil system that was not inspected during replacement. A new idler should move freely, sit squarely, and run with a measured track sag—not an assumed setting. For Ontario fleets, clean-out discipline matters as much as component selection because compacted material can change alignment and load patterns quickly.” — AFT Parts Undercarriage Support Team
AFT Parts supports a maintenance-first approach: inspect the complete track system, identify the wear cause, install a compatible component, and document the repair. This approach helps operators make informed choices across replacement parts for excavators and other heavy machinery.
Can You Prevent Early Idler Wear After Replacement?
Yes. Daily cleaning, correct tension, proper operating habits, regular inspections, and timely replacement of related worn parts can significantly reduce early idler wear. Prevention is especially important where abrasive materials, mud, snow, frost, or debris accumulate in the undercarriage.
Keep the undercarriage clean at the end of each shift. Remove packed material from around the idler, rollers, sprocket, guards, and track chain. Inspect after working in mud, rock, demolition material, snow, or frozen soil.
Operators can extend idler life by:
-
Avoiding unnecessary high-speed travel
-
Minimizing constant reverse travel when practical
-
Reducing sharp turns on abrasive ground
-
Keeping track tension within specification
-
Checking for leaks, cracks, and loose hardware
-
Inspecting rollers, sprockets, and chain wear at the same time
-
Scheduling repairs before a seized or collapsed component damages the entire system
What Are Common Questions About JD245GLC Idler Repair?
How long does it take to replace a front idler?
A prepared service team can often complete the mechanical replacement within a shift, but time varies with track condition, access, seized hardware, debris buildup, recoil-system damage, and whether the track must be separated. Plan extra time for inspection and correct tension adjustment.
Can I replace only the idler wheel and reuse the adjuster?
Sometimes, but only if the adjuster, recoil spring, seals, slides, and mounting hardware pass inspection. If the tensioner leaks, sticks, or has damaged components, reusing it can cause the new idler to wear prematurely or make correct track adjustment impossible.
Should the track be removed completely?
Not always. Some idler assemblies can be replaced with the track loosened and supported. Separate or remove track segments only when required for safe access, adequate clearance, or control of the track and idler during removal.
What causes a front idler to wear unevenly?
Uneven wear commonly results from track misalignment, excessive or insufficient tension, worn guide plates, damaged rollers, bent track-frame components, debris packing, or unevenly worn sprockets and track links. Replacing the idler without correcting these issues can repeat the failure.
This article is part of the idlers guide, which covers what the front idler does, how to confirm the right wheel and how to read wear.